![Iventis_Pos_CMYK-1.jpg]](https://support.iventis.com/hs-fs/hubfs/Iventis_Pos_CMYK-1.jpg?height=50&name=Iventis_Pos_CMYK-1.jpg)
In Iventis, each layer will contain different types of objects which make up your plan. You can therefore use layers to organise your plans, for example, having a layer for "workforce" and another for "barriers". Each layer can contain as many objects on the map as you need.
In Iventis, we can create lines, areas, dots, icons and 3D models, all of which are layer types. Although Iventis has a wide range of pre-existing layer templates to choose from, sometimes you may wish to create your own layer and customise it to your requirements.
Adding a layer to your plan
At the top of the left-hand "Layers Panel", you will see a + button. Click here to show the layer creation screen.

Within the new layer screen you'll see a range of layer templates. These are organised into categories such as "Areas" and "Routes". You can also use the search bar to find something specific.
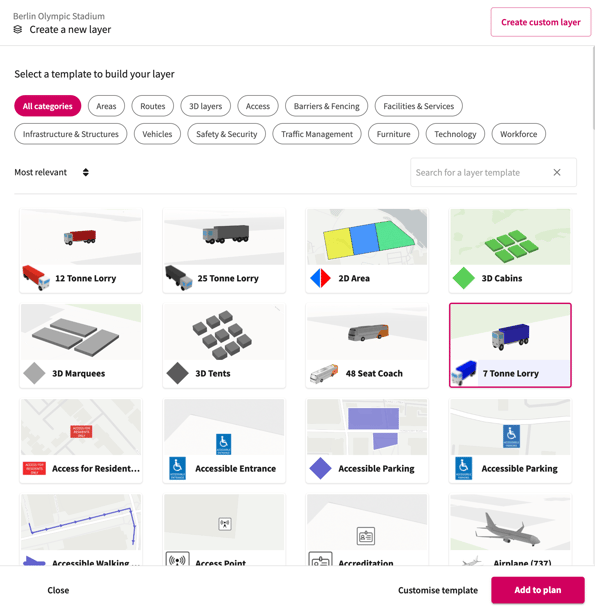
To create a layer from a template, click on the template then press "Add to plan".
You can also customise a template before adding it if you wish.
Once your layer is added to the map, it can be re-named (click on it's name in the side panel or open "Layer Settings" from the menu.
Creating a custom layer
If you can't find a suitable template, you can make a custom layer by pressing the "Create custom layer" at the top right. You can also use a template and customise it.
Give your layer a name, then choose the type of layer from the list of options. For example, if you're planning bus routes choose a "Line" type.

Once chosen, click Next and you'll be taken to the style settings for the layer. In the style settings, you can choose a variety of custom options, such as changing the colour, adding a border, adding attributes or adding text.

Once you are happy with your styling, press Save, and your layer will appear in the layer panel on the left hand side of the screen. You can now hit the pen at the top right of the screen to draw within your new layer!

Deleting a layer:
If you would like to delete a layer, ensure the layer you want to delete is selected by clicking on it. You'll know it's selected as there will be a pink shade over the layer in the layer list. Then click the bin icon at the bottom left of your screen, which will allow you to delete the layer.

Once you click the delete button, you'll receive a prompt advising you that deleting the layer will also delete all the content. Please note, this cannot be reversed. Once happy to delete, press the "Delete Layer/Items" button and your selected layer(s) will be deleted.
